musubi-tuner を利用した FramePack の 1フレーム推論で画像生成する手順を紹介します。
GitでGitHubからダウンロードする手順を紹介します。
musubi-tunerを配置したいディレクトリで次のコマンドを実行します。
git.exe clone https://github.com/kohya-ss/musubi-tuner.git
または
(git.exe のフルパス) clone https://github.com/kohya-ss/musubi-tuner.git
fpack_generate_video.pyの書式は以下です。
python fpack_generate_video.py \
    --dit path/to/dit_model \
    --vae path/to/vae_model.safetensors \
    --text_encoder1 path/to/text_encoder1 \
    --text_encoder2 path/to/text_encoder2 \
    --image_encoder path/to/image_encoder_model.safetensors \
    --image_path path/to/start_image.jpg \
    --prompt "(プロンプト)" \
    --video_size (出力動画の高さ) (出力動画の幅) \
    --video_seconds (生成動画の秒数) \
    --fps (FPSの値) \
    --infer_steps (ステップ数) \
    --attn_mode sdpa \
    --fp8_scaled \
    --vae_chunk_size (サイズ) \
    --vae_spatial_tile_sample_min_size (サイズ) \
    --save_path path/to/save/dir \
    --output_type both \
    --seed (シード値) \
    --lora_multiplier 1.0 \
    --lora_weight path/to/lora.safetensors
通常は以下の値を用いるようです。
python fpack_generate_video.py \
    --dit path/to/dit_model \
    --vae path/to/vae_model.safetensors \
    --text_encoder1 path/to/text_encoder1 \
    --text_encoder2 path/to/text_encoder2 \
    --image_encoder path/to/image_encoder_model.safetensors \
    --image_path path/to/start_image.jpg \
    --prompt "(プロンプト)" \
    --video_size (出力動画の高さ) (出力動画の幅) \
    --video_seconds 5 \
    --fps 30 \
    --infer_steps 25 \
    --attn_mode sdpa \
    --fp8_scaled \
    --vae_chunk_size 32 \
    --vae_spatial_tile_sample_min_size 128 \
    --save_path path/to/save/dir \
    --output_type both \
    --seed (シード値) \
    --lora_multiplier 1.0 \
    --lora_weight path/to/lora.safetensors
今回は1フレーム推論を利用するため、以下のオプションを追加します。
    --video_sections 1 \
    --output_type latent_images \
    --one_frame_inference default \
    --latent_window_size 9
モデルのパスには以下を指定します。
ditモデルのパス。今回の例では、以下のパスになります。FramePackのモデルを指定します。
末尾のディレクトリ<hex-uuid-folder>はPC・システムごとに異なる値の可能性がありますので、お使いのFramePackのディレクトリを確認してください。
(FramePackのインストール先パス)\webui\hf_download\hub\models--lllyasviel--FramePackI2V_HY\snapshots\ab239828e0b384fed75580f186f078717d4020f7
テキストエンコーダー、VAEのモデルのパス。今回の例では、以下のパスになります。
末尾のディレクトリ<hex-uuid-folder>はPC・システムごとに異なる値の可能性がありますので、お使いのFramePackのディレクトリを確認してください。
(FramePackのインストール先パス)\webui\hf_download\hub\models--hunyuanvideo-community--HunyuanVideo\snapshots\e8c2aaa66fe3742a32c11a6766aecbf07c56e773
イメージエンコーダーのモデルのパス。今回の例では、以下のパスになります。
末尾のディレクトリ<hex-uuid-folder>はPC・システムごとに異なる値の可能性がありますので、お使いのFramePackのディレクトリを確認してください。
(FramePackのインストール先パス)\webui\hf_download\hub\models--lllyasviel--flux_redux_bfl\snapshots\45b801affc54ff2af4e5daf1b282e0921901db87
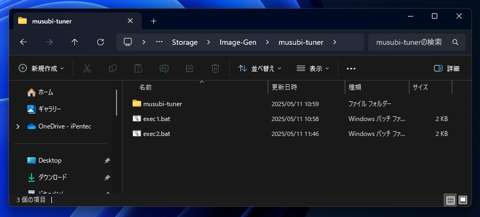
1フレーム推論するためのバッチファイルを作成します。
以下のファイルになりました。バッチファイルは、musubi-tunerのディレクトリの一つ上のディレクトリに配置しています。
D:\Storage\Image-Gen\framepack_cu126_torch26\system\python\python.exe musubi-tuner\fpack_generate_video.py ^
    --dit D:\Storage\Image-Gen\framepack_cu126_torch26\webui\hf_download\hub\models--lllyasviel--FramePackI2V_HY\snapshots\86cef4396041b6002c957852daac4c91aaa47c79 ^
    --vae D:\Storage\Image-Gen\framepack_cu126_torch26\webui\hf_download\hub\models--hunyuanvideo-community--HunyuanVideo\snapshots\e8c2aaa66fe3742a32c11a6766aecbf07c56e773 ^
    --text_encoder1 D:\Storage\Image-Gen\framepack_cu126_torch26\webui\hf_download\hub\models--hunyuanvideo-community--HunyuanVideo\snapshots\e8c2aaa66fe3742a32c11a6766aecbf07c56e773 ^
    --text_encoder2 D:\Storage\Image-Gen\framepack_cu126_torch26\webui\hf_download\hub\models--hunyuanvideo-community--HunyuanVideo\snapshots\e8c2aaa66fe3742a32c11a6766aecbf07c56e773 ^
    --image_encoder D:\Storage\Image-Gen\framepack_cu126_torch26\webui\hf_download\hub\models--lllyasviel--flux_redux_bfl\snapshots\45b801affc54ff2af4e5daf1b282e0921901db87 ^
    --image_path C:\data\1f\image.png ^
    --prompt "turn around, girl turned her back," ^
    --video_size 640 640 ^
    --video_seconds 5 ^
    --fps 30 ^
    --infer_steps 25 ^
    --attn_mode sdpa ^
    --fp8_scaled ^
    --vae_chunk_size 32 ^
    --vae_spatial_tile_sample_min_size 128 ^
    --save_path C:\data\1f ^
    --output_type both ^
    --seed 1234 ^
    --lora_multiplier 1.0 ^
    --video_sections 1 ^
    --output_type latent_images ^
    --one_frame_inference default ^
    --latent_window_size 9
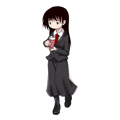
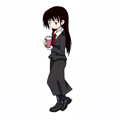
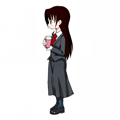
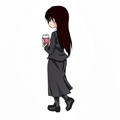
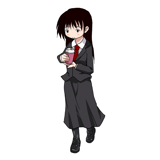
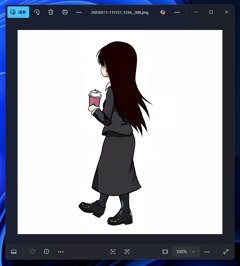
C:\data\1f\image.png は入力画像です。以下の画像を指定しています。640x640ピクセルです。
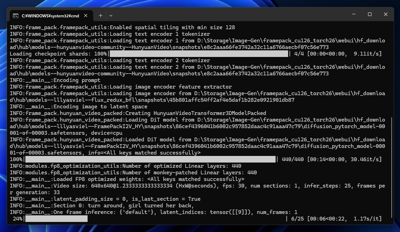
作成したバッチファイルを実行します。
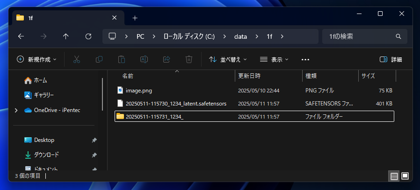
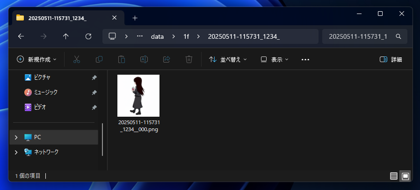
出力ディレクトリに (日付)-(時刻)_(Seed値)_latent.safetensors ファイルと、(日付)-(時刻)_(Seed値)_ ディレクトリが作成されます。
ディレクトリ内に生成された画像が配置されています。
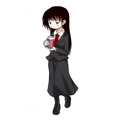
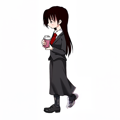
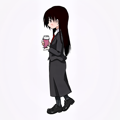
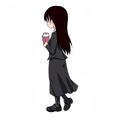
画像は下図です。キャラクターが後ろを向いた状態の画像が作成できました。
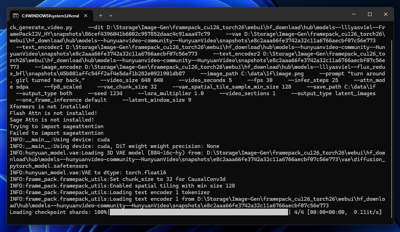
latent_window_size を下げてvideo_sectionsの値を増やすことで、コマ送りの画像が生成できないかを検証します。
以下のバッチファイルで生成します。
D:\Storage\Image-Gen\framepack_cu126_torch26\system\python\python.exe musubi-tuner\fpack_generate_video.py ^
    --dit D:\Storage\Image-Gen\framepack_cu126_torch26\webui\hf_download\hub\models--lllyasviel--FramePackI2V_HY\snapshots\86cef4396041b6002c957852daac4c91aaa47c79 ^
    --vae D:\Storage\Image-Gen\framepack_cu126_torch26\webui\hf_download\hub\models--hunyuanvideo-community--HunyuanVideo\snapshots\e8c2aaa66fe3742a32c11a6766aecbf07c56e773 ^
    --text_encoder1 D:\Storage\Image-Gen\framepack_cu126_torch26\webui\hf_download\hub\models--hunyuanvideo-community--HunyuanVideo\snapshots\e8c2aaa66fe3742a32c11a6766aecbf07c56e773 ^
    --text_encoder2 D:\Storage\Image-Gen\framepack_cu126_torch26\webui\hf_download\hub\models--hunyuanvideo-community--HunyuanVideo\snapshots\e8c2aaa66fe3742a32c11a6766aecbf07c56e773 ^
    --image_encoder D:\Storage\Image-Gen\framepack_cu126_torch26\webui\hf_download\hub\models--lllyasviel--flux_redux_bfl\snapshots\45b801affc54ff2af4e5daf1b282e0921901db87 ^
    --image_path C:\data\1f\image.png ^
    --prompt "turn around, girl turned her back," ^
    --video_size 640 640 ^
    --video_seconds 5 ^
    --fps 30 ^
    --infer_steps 25 ^
    --attn_mode sdpa ^
    --fp8_scaled ^
    --vae_chunk_size 32 ^
    --vae_spatial_tile_sample_min_size 128 ^
    --save_path C:\data\1f ^
    --output_type both ^
    --seed 987654 ^
    --lora_multiplier 1.0 ^
    --video_sections 16 ^
    --output_type latent_images ^
    --one_frame_inference default ^
    --latent_window_size 1
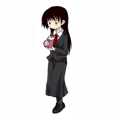
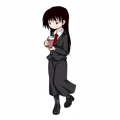
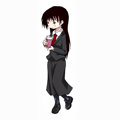
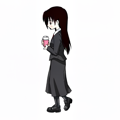
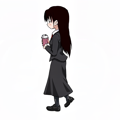
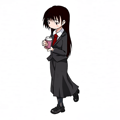
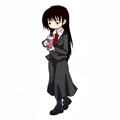
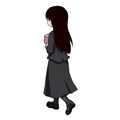
生成結果は下図です。
コマ送りのようになるかと思われたのですが、そのような結果にはなりませんでした。