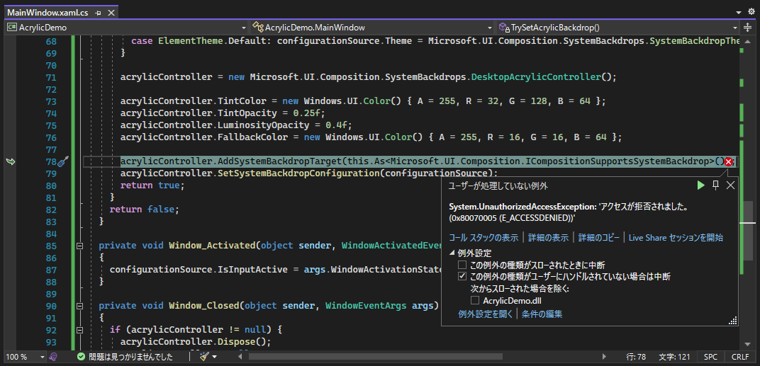
System.UnauthorizedAccessException: 'アクセスが拒否されました。 (0x80070005 (E_ACCESSDENIED))'
Acrylic material (アクリル) を利用したウィンドウ背景を実装するコードを紹介します。
Acrylic (アクリル) を利用した半透明ウィンドウを実装します。
半透明のウィンドウはWindows Vista の Aero Glass で実装されており、Windows 7ではタイトルバーが半透明で表現されていました。
しかし、その後Windows 8ではフラットデザイン(Modern UI / Metro UI / Material Design)が採用されたこともあり、半透明の表現はなくなってしまいました。
その後、Windows 10の登場により Fluent Design が採用され、再度、半透明の表現が採用されました。
半透明の実装(表現)も、Aero Glassから、Acrylic materialに変わり機能面でも強化されています。
この記事では、WinUI 3アプリケーションでウィンドウ背景をAcrylic material (アクリル)で表現する方法を紹介します。
WinUI 3アプリケーションを作成します。
以下のコードを記述します。
<Window
    x:Class="AcrylicDemo.MainWindow"
    xmlns="http://schemas.microsoft.com/winfx/2006/xaml/presentation"
    xmlns:x="http://schemas.microsoft.com/winfx/2006/xaml"
    xmlns:local="using:AcrylicDemo"
    xmlns:d="http://schemas.microsoft.com/expression/blend/2008"
    xmlns:mc="http://schemas.openxmlformats.org/markup-compatibility/2006"
    mc:Ignorable="d">

    <StackPanel Orientation="Horizontal" HorizontalAlignment="Center" VerticalAlignment="Center">
        <Button x:Name="myButton" Click="myButton_Click">Click Me</Button>
    </StackPanel>
</Window>
using Microsoft.UI.Composition.SystemBackdrops;
using Microsoft.UI.Xaml;
using Microsoft.UI.Xaml.Controls;
using Microsoft.UI.Xaml.Controls.Primitives;
using Microsoft.UI.Xaml.Data;
using Microsoft.UI.Xaml.Input;
using Microsoft.UI.Xaml.Media;
using Microsoft.UI.Xaml.Navigation;
using System;
using System.Collections.Generic;
using System.IO;
using System.Linq;
using System.Runtime.InteropServices.WindowsRuntime;
using Windows.Foundation;
using Windows.Foundation.Collections;
using WinRT;

// To learn more about WinUI, the WinUI project structure,
// and more about our project templates, see: http://aka.ms/winui-project-info.

namespace AcrylicDemo
{
  /// <summary>
  /// An empty window that can be used on its own or navigated to within a Frame.
  /// </summary>
  public sealed partial class MainWindow : Window
  {
    WindowsSystemDispatcherQueueHelper wsdqHelper;
    Microsoft.UI.Composition.SystemBackdrops.DesktopAcrylicController acrylicController;
    Microsoft.UI.Composition.SystemBackdrops.SystemBackdropConfiguration configurationSource;


    public MainWindow()
    {
      this.InitializeComponent();
      wsdqHelper = new WindowsSystemDispatcherQueueHelper();
      wsdqHelper.EnsureWindowsSystemDispatcherQueueController();
      SetBackdrop();
    }

    private void myButton_Click(object sender, RoutedEventArgs e)
    {
      myButton.Content = "Clicked";
    }

    public void SetBackdrop()
    {
      if (acrylicController != null) {
        acrylicController.Dispose();
        acrylicController = null;
      }
      configurationSource = null;

      TrySetAcrylicBackdrop();
    }

    private bool TrySetAcrylicBackdrop()
    {
      if (Microsoft.UI.Composition.SystemBackdrops.DesktopAcrylicController.IsSupported()) {
        configurationSource = new Microsoft.UI.Composition.SystemBackdrops.SystemBackdropConfiguration();
        this.Activated += Window_Activated;
        this.Closed += Window_Closed;

        configurationSource.IsInputActive = true;
        switch (((FrameworkElement)this.Content).ActualTheme) {
          case ElementTheme.Dark: configurationSource.Theme = Microsoft.UI.Composition.SystemBackdrops.SystemBackdropTheme.Dark; break;
          case ElementTheme.Light: configurationSource.Theme = Microsoft.UI.Composition.SystemBackdrops.SystemBackdropTheme.Light; break;
          case ElementTheme.Default: configurationSource.Theme = Microsoft.UI.Composition.SystemBackdrops.SystemBackdropTheme.Default; break;
        }

        acrylicController = new Microsoft.UI.Composition.SystemBackdrops.DesktopAcrylicController();

        acrylicController.TintColor = new Windows.UI.Color() { A = 255, R = 32, G = 128, B = 64 };
        acrylicController.TintOpacity = 0.25f;
        acrylicController.LuminosityOpacity = 0.4f;
        acrylicController.FallbackColor = new Windows.UI.Color() { A = 255, R = 16, G = 16, B = 64 };

        acrylicController.AddSystemBackdropTarget(this.As<Microsoft.UI.Composition.ICompositionSupportsSystemBackdrop>());
        acrylicController.SetSystemBackdropConfiguration(configurationSource);
        return true;
      }
      return false;
    }

    private void Window_Activated(object sender, WindowActivatedEventArgs args)
    {
      configurationSource.IsInputActive = args.WindowActivationState != WindowActivationState.Deactivated;
    }

    private void Window_Closed(object sender, WindowEventArgs args)
    {
      if (acrylicController != null) {
        acrylicController.Dispose();
        acrylicController = null;
      }
      this.Activated -= Window_Activated;
      configurationSource = null;
    }

  }
}
using System;
using System.Collections.Generic;
using System.Linq;
using System.Runtime.InteropServices;
using System.Text;
using System.Threading.Tasks;

namespace AcrylicDemo
{
  internal class WindowsSystemDispatcherQueueHelper
  {
    [StructLayout(LayoutKind.Sequential)]
    struct DispatcherQueueOptions
    {
      internal int dwSize;
      internal int threadType;
      internal int apartmentType;
    }

    [DllImport("CoreMessaging.dll")]
    private static extern int CreateDispatcherQueueController([In] DispatcherQueueOptions options, [In, Out, MarshalAs(UnmanagedType.IUnknown)] ref object dispatcherQueueController);

    object m_dispatcherQueueController = null;
    public void EnsureWindowsSystemDispatcherQueueController()
    {
      if (m_dispatcherQueueController == null) {
        DispatcherQueueOptions options;
        options.dwSize = Marshal.SizeOf(typeof(DispatcherQueueOptions));
        options.threadType = 2;    // DQTYPE_THREAD_CURRENT
        options.apartmentType = 2; // DQTAT_COM_STA

        CreateDispatcherQueueController(options, ref m_dispatcherQueueController);
      }
    }
  }
}
基本的なコードの構造はMica(マイカ)の場合と同様です。マイカの実装記事も参照してください。
WindowsSystemDispatcherQueueHelperでは、CreateDispatcherQueueController() 関数を呼び出します。
クラスにする必要はありませんが、CreateDispatcherQueueController()関数を呼び出さない場合、DesktopAcrylicControllerオブジェクトの AddSystemBackdropTarget()
の呼び出し時に、System.UnauthorizedAccessException例外が発生してしまいます。
プロジェクトの作成時に、ひな形で生成されるXAMLから変更はありません。
コンストラクタの InitializeComponent呼び出しの後に、WindowsSystemDispatcherQueueHelperクラスの作成と、
CreateDispatcherQueueController() 関数を呼び出すための EnsureWindowsSystemDispatcherQueueController メソッドの呼び出しを実行します。
呼び出し後に、SetBackdropメソッドを呼び出し、DesktopAcrylicControllerの設定をします。
  public MainWindow()
  {
    this.InitializeComponent();
    wsdqHelper = new WindowsSystemDispatcherQueueHelper();
    wsdqHelper.EnsureWindowsSystemDispatcherQueueController();
    SetBackdrop();
  }
SetBackdropメソッドでは、DesktopAcrylicControllerのインスタンスが作成されているか確認し、インスタンスが作成されていれば、
Disposeして開放します。その後、TrySetAcrylicBackdropメソッドを呼び出し、DesktopAcrylicControllerの設定をします。
    public void SetBackdrop()
    {
      if (acrylicController != null) {
        acrylicController.Dispose();
        acrylicController = null;
      }
      configurationSource = null;

      TrySetAcrylicBackdrop();
    }
TrySetAcrylicBackdrop メソッドが DesktopAcrylicController オブジェクトを作成し、設定をする処理です。
実行環境で、Acrylic material が有効かのチェックを Microsoft.UI.Composition.SystemBackdrops.DesktopAcrylicController.IsSupported() でチェックし、
trueである場合にのみ処理を実行します。
DesktopAcrylicController に渡すアクリルの設定(Microsoft.UI.Composition.SystemBackdrops.SystemBackdropConfiguration)をMicrosoft.UI.Composition.SystemBackdrops.SystemBackdropConfiguration() メソッドで作成し、
その後、現在のカラーテーマに合わせて、SystemBackdropConfigurationオブジェクトのThemeプロパティを設定します。
また、アクリル素材の色、透過度、彩度の量を設定します。
プロパティの項目と設定値は次の通りです。
| プロパティ名 | 設定値の意味 | 値の範囲 |
|---|---|---|
| TintColor | アクリル素材の色です。色/濃淡のオーバーレイ レイヤーの色を指定します。 | Windows.UI.Colorのとる範囲 |
| TintOpacity | アクリル素材の透過度です。色/濃淡のオーバーレイ レイヤーの透明度を指定します。0に近いほど素材の色が反映されず、1に近いほど素材の色が反映されます。 | 0 ~ 1.0 |
| LuminosityOpacity | 背景からアクリル サーフェスの間で許容される彩度の量を指定します。0に近いほど暗くなり、1に近いほど明るくなります。 | 0 ~ 1.0 |
| FallbackColor | ウィンドウが非アクティブになった際のカラーを指定します。 | Windows.UI.Colorのとる範囲 |
設定後、作成したDesktopAcrylicControllerに、
AddSystemBackdropTargetメソッドで、このウィンドウをターゲットとするよう指定し、
SetSystemBackdropConfigurationメソッドでSystemBackdropConfigurationを設定します。
  private bool TrySetAcrylicBackdrop()
  {
    if (Microsoft.UI.Composition.SystemBackdrops.DesktopAcrylicController.IsSupported()) {
      configurationSource = new Microsoft.UI.Composition.SystemBackdrops.SystemBackdropConfiguration();
      this.Activated += Window_Activated;
      this.Closed += Window_Closed;

      configurationSource.IsInputActive = true;
      switch (((FrameworkElement)this.Content).ActualTheme) {
        case ElementTheme.Dark: configurationSource.Theme = Microsoft.UI.Composition.SystemBackdrops.SystemBackdropTheme.Dark; break;
        case ElementTheme.Light: configurationSource.Theme = Microsoft.UI.Composition.SystemBackdrops.SystemBackdropTheme.Light; break;
        case ElementTheme.Default: configurationSource.Theme = Microsoft.UI.Composition.SystemBackdrops.SystemBackdropTheme.Default; break;
      }

      acrylicController = new Microsoft.UI.Composition.SystemBackdrops.DesktopAcrylicController();

      acrylicController.TintColor = new Windows.UI.Color() { A = 255, R = 32, G = 128, B = 64 };
      acrylicController.TintOpacity = 0.25f;
      acrylicController.LuminosityOpacity = 0.4f;
      acrylicController.FallbackColor = new Windows.UI.Color() { A = 255, R = 16, G = 16, B = 64 };

      acrylicController.AddSystemBackdropTarget(this.As<Microsoft.UI.Composition.ICompositionSupportsSystemBackdrop>());
      acrylicController.SetSystemBackdropConfiguration(configurationSource);
      return true;
    }
    return false;
  }
WindowのActivated イベントです。ウィンドウ状態が、Deactivated の場合は、IsInputActive プロパティにfalseを設定しています。
(それ以外の場合はtrueを設定しています。)
  private void Window_Activated(object sender, WindowActivatedEventArgs args)
  {
    configurationSource.IsInputActive = args.WindowActivationState != WindowActivationState.Deactivated;
  }
WindowのClosed イベントも実装しています。ウィンドウクローズ時に、MicaControllerをDisposeすることが推奨されているようです。
  private void Window_Closed(object sender, WindowEventArgs args)
  {
    if (acrylicController != null) {
      acrylicController.Dispose();
      acrylicController = null;
    }
    this.Activated -= Window_Activated;
    configurationSource = null;
  }
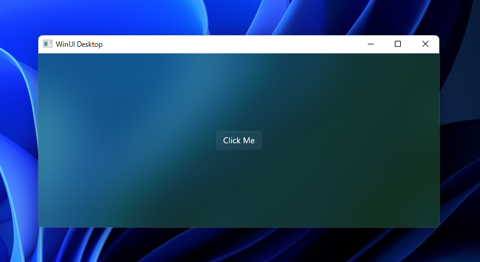
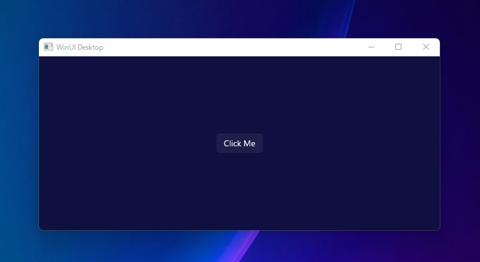
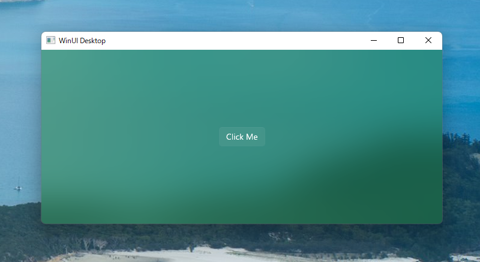
プロジェクトを実行します。下図のウィンドウが表示されます。
背景がぼかされて透過で表示されています。素材の色として設定した緑色も反映されています。
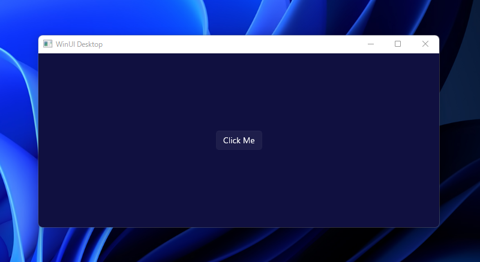
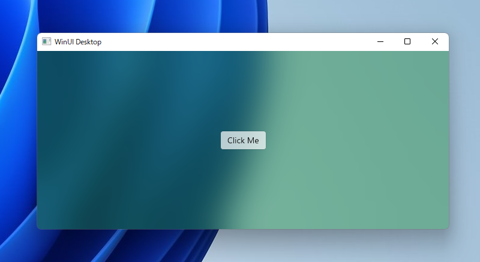
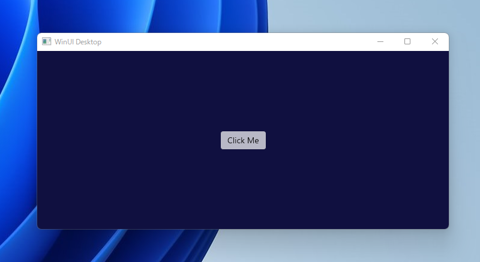
ほかのウィンドウをクリックして非アクティブにするとFallbackColorに設定した色に変わります。
色の変化はアニメーションで変化します。
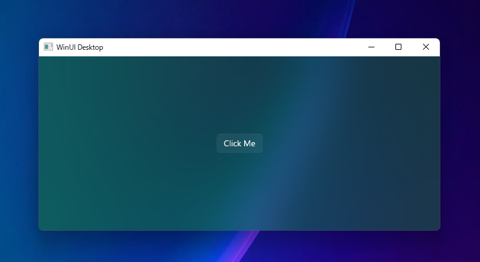
壁紙を変えて実行した例です。
ライトカラーの場合です。
アニメーションの様子の動画です。