WinUI3アプリケーションでボタンのクリック時に処理を実行するコードを紹介します。
WinUI3アプリケーションでボタンのクリック時に処理を実行する場合は、XAMLのボタンのタグに Click属性を追加し、
イベント発生時に実行するウィンドウのクラスのメソッド名を指定します。
ウィンドウのクラスのメソッドに実行したい処理を記述します。
WinUI3アプリケーションを作成します。
プロジェクトの作成手順はこちらの記事を参照してください。
下記のコードを記述します。
<Window
    x:Class="SimpleButtonAndTextBoxApp.MainWindow"
    xmlns="http://schemas.microsoft.com/winfx/2006/xaml/presentation"
    xmlns:x="http://schemas.microsoft.com/winfx/2006/xaml"
    xmlns:local="using:SimpleButtonAndTextBoxApp"
    xmlns:d="http://schemas.microsoft.com/expression/blend/2008"
    xmlns:mc="http://schemas.openxmlformats.org/markup-compatibility/2006"
    mc:Ignorable="d">

    <StackPanel Orientation="Horizontal" HorizontalAlignment="Center" VerticalAlignment="Center">
    <TextBox x:Name="TextBox1"/>
    <TextBox x:Name="TextBox2"/>
    <Button Style="{StaticResource AccentButtonStyle}" x:Name="myButton" Click="myButton_Click">Exec</Button>
    <TextBox x:Name="TextBox3"/>
  </StackPanel>
</Window>
using Microsoft.UI.Xaml;
using Microsoft.UI.Xaml.Controls;
using Microsoft.UI.Xaml.Controls.Primitives;
using Microsoft.UI.Xaml.Data;
using Microsoft.UI.Xaml.Input;
using Microsoft.UI.Xaml.Media;
using Microsoft.UI.Xaml.Navigation;
using System;
using System.Collections.Generic;
using System.IO;
using System.Linq;
using System.Runtime.InteropServices.WindowsRuntime;
using Windows.Foundation;
using Windows.Foundation.Collections;

// To learn more about WinUI, the WinUI project structure,
// and more about our project templates, see: http://aka.ms/winui-project-info.

namespace SimpleButtonAndTextBoxApp
{
  /// <summary>
  /// An empty window that can be used on its own or navigated to within a Frame.
  /// </summary>
  public sealed partial class MainWindow : Window
  {
    public MainWindow()
    {
      this.InitializeComponent();
    }

    private void myButton_Click(object sender, RoutedEventArgs e)
    {
      int a = Convert.ToInt32(TextBox1.Text);
      int b = Convert.ToInt32(TextBox2.Text);
      int c = a + b;
      TextBox3.Text = c.ToString();
    }
  }
}
XAMLの下記コードでこのXAMLウィンドウに対するウィンドウのクラスを指定しています。
x:Class="SimpleButtonAndTextBoxApp.MainWindow"
XAMLのテキストボックスの配置についてはこちらの記事を参照してください。
ボタンのXAMLタグは以下のコードになります。x:Name でボタンコントロールの名前を設定しています。
クリックイベントは Click属性の値に実行するメソッド名を記述します。下記のコードでは、"myButton_Click"が設定されているため、
ウィンドウクラスである、SimpleButtonAndTextBoxApp.MainWindow クラスの myButton_Click() メソッドがボタンクリック時に呼び出されます。
<Button Style="{StaticResource AccentButtonStyle}" x:Name="myButton" Click="myButton_Click">Exec</Button>
ボタンクリック時に下記のコードが実行されます。テキストボックスの値を取得し、数値に変換し2つの値を足した結果を、
もう一つのテキストボックスに表示します。
    private void myButton_Click(object sender, RoutedEventArgs e)
    {
      int a = Convert.ToInt32(TextBox1.Text);
      int b = Convert.ToInt32(TextBox2.Text);
      int c = a + b;
      TextBox3.Text = c.ToString();
    }
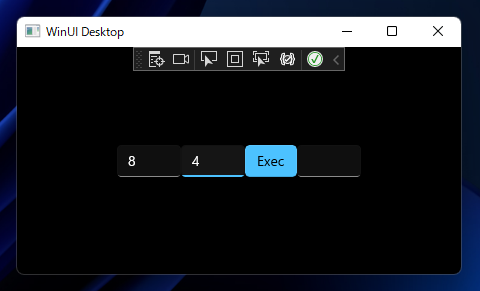
プロジェクトを実行します。
下図のウィンドウが表示されます。
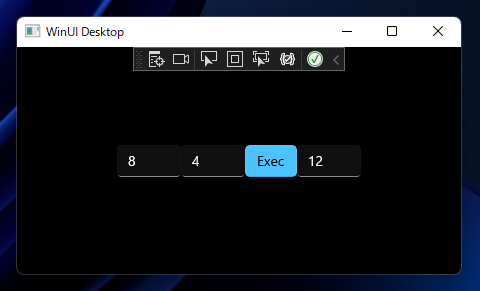
左側の2つのテキストボックスに数値を入力し、ボタンをクリックします。
ボタンをクリックすると、テキストボックスに入力した数値の和が右側のテキストボックスに表示されます。
WinUI3 アプリケーションでボタンのクリック処理を実装できました。