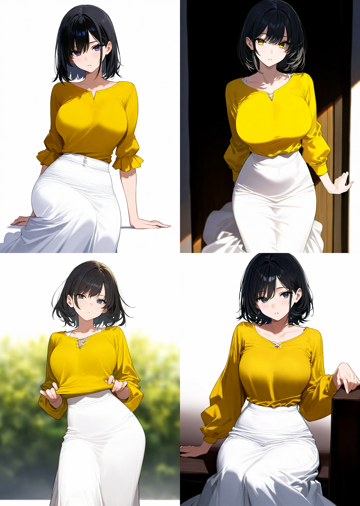
Prompt: 1girl,yellow shirt, white long skirt, masterpiece, best quality
Negative prompt: worst quality, low quality
Stable Diffusionの新しい一部のモデルで画像生成するとノイズ画像が生成され、画像が生成できない現象と対処法を紹介します。
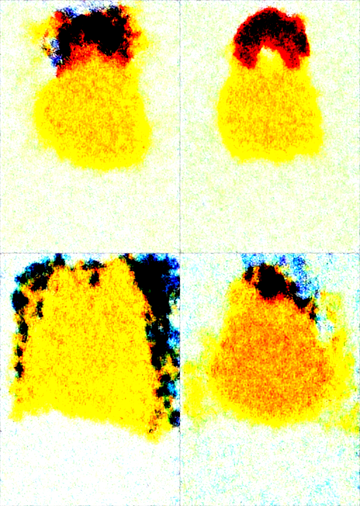
新しいモデルで画像を生成すると以下のノイズ画像が生成され、正しい画像が生成できないです。
ノイズ画像が生成される原因はいくつかありますが、一部のモデルで画像生成できない場合は、
V-Prediction (V-Pred)と呼ばれる、新しいノイズ予測方式を利用しいるモデルを選択している場合に発生します。
WebUIがV-Predictionのモードに切り替わっていないことが原因と考えられます。
WebUI (A1111)を利用している場合は、devブランチのWebUIを導入します。
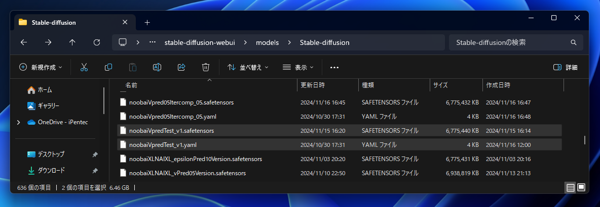
以下のディレクトリを開きます。
(Stable Diffusion WebUIの配置ディレクトリ)\configs
以下のファイルが配置されています。sd_xl_v.yamlファイルをコピーします。
sd_xl_v.yamlファイルを以下のディレクトリに配置しファイル名をモデルの名称と合わせます。
(Stable Diffusion WebUIの配置ディレクトリ)\models\Stable-diffusion\(モデルのファイル名).yaml
WebUIでモデルの一覧を更新し、別のモデルを選択して、再度モデルを選択しなおします。
画像生成を実行します。ノイズ画像ではなく、プロンプトに従った画像が生成されます。
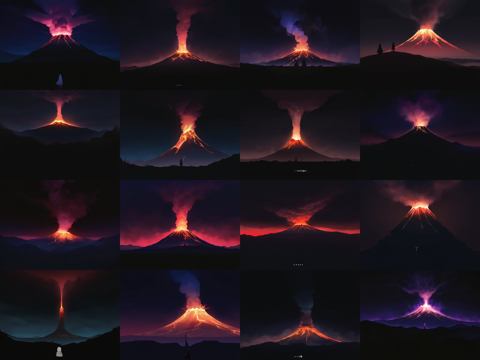
V-Predictionモデルは、彩度が高い画像が生成されるモデルが多く、暗い部分や黒も引き締まった表現になります。
model:
  target: sgm.models.diffusion.DiffusionEngine
  params:
    scale_factor: 0.13025
    disable_first_stage_autocast: True

    denoiser_config:
      target: sgm.modules.diffusionmodules.denoiser.DiscreteDenoiser
      params:
        num_idx: 1000

        weighting_config:
          target: sgm.modules.diffusionmodules.denoiser_weighting.VWeighting
        scaling_config:
          target: sgm.modules.diffusionmodules.denoiser_scaling.VScaling
        discretization_config:
          target: sgm.modules.diffusionmodules.discretizer.LegacyDDPMDiscretization

    network_config:
      target: sgm.modules.diffusionmodules.openaimodel.UNetModel
      params:
        adm_in_channels: 2816
        num_classes: sequential
        use_checkpoint: False
        in_channels: 4
        out_channels: 4
        model_channels: 320
        attention_resolutions: [4, 2]
        num_res_blocks: 2
        channel_mult: [1, 2, 4]
        num_head_channels: 64
        use_spatial_transformer: True
        use_linear_in_transformer: True
        transformer_depth: [1, 2, 10]  # note: the first is unused (due to attn_res starting at 2) 32, 16, 8 --> 64, 32, 16
        context_dim: 2048
        spatial_transformer_attn_type: softmax-xformers
        legacy: False

    conditioner_config:
      target: sgm.modules.GeneralConditioner
      params:
        emb_models:
          # crossattn cond
          - is_trainable: False
            input_key: txt
            target: sgm.modules.encoders.modules.FrozenCLIPEmbedder
            params:
              layer: hidden
              layer_idx: 11
          # crossattn and vector cond
          - is_trainable: False
            input_key: txt
            target: sgm.modules.encoders.modules.FrozenOpenCLIPEmbedder2
            params:
              arch: ViT-bigG-14
              version: laion2b_s39b_b160k
              freeze: True
              layer: penultimate
              always_return_pooled: True
              legacy: False
          # vector cond
          - is_trainable: False
            input_key: original_size_as_tuple
            target: sgm.modules.encoders.modules.ConcatTimestepEmbedderND
            params:
              outdim: 256  # multiplied by two
          # vector cond
          - is_trainable: False
            input_key: crop_coords_top_left
            target: sgm.modules.encoders.modules.ConcatTimestepEmbedderND
            params:
              outdim: 256  # multiplied by two
          # vector cond
          - is_trainable: False
            input_key: target_size_as_tuple
            target: sgm.modules.encoders.modules.ConcatTimestepEmbedderND
            params:
              outdim: 256  # multiplied by two

    first_stage_config:
      target: sgm.models.autoencoder.AutoencoderKLInferenceWrapper
      params:
        embed_dim: 4
        monitor: val/rec_loss
        ddconfig:
          attn_type: vanilla-xformers
          double_z: true
          z_channels: 4
          resolution: 256
          in_channels: 3
          out_ch: 3
          ch: 128
          ch_mult: [1, 2, 4, 4]
          num_res_blocks: 2
          attn_resolutions: []
          dropout: 0.0
        lossconfig:
          target: torch.nn.Identity
Stable Diffudion WebUI ReForge の場合の対応方法です。
Stable Diffusion WebUI ReForge の場合はモデルに合わせてモードに切り替えができるため、先に紹介したノイズ画像が生成されるケースは少ないですが、
暗い部分がつぶれてしまったり、明るい部分が白く飛んでしまう場合があります。
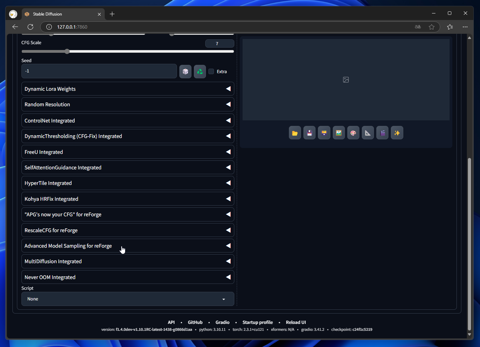
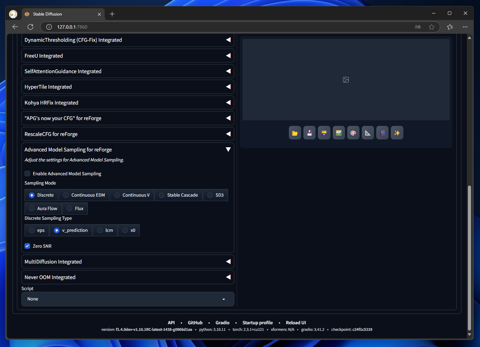
Stable Diffusion WebUI ReForge を起動します。画像生成するタブ(txt2img または img2img)を選択します。
ページを下にスクロールします。左側に[Advanced Model Sampling for reForge]のパネルがありますのでクリックしてパネルを開きます。
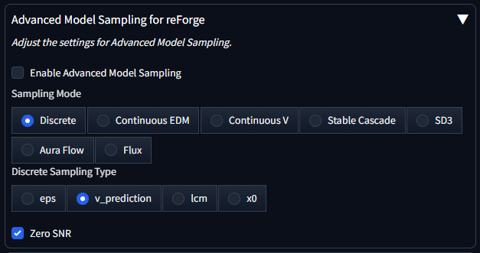
パネルが展開されて表示されました。
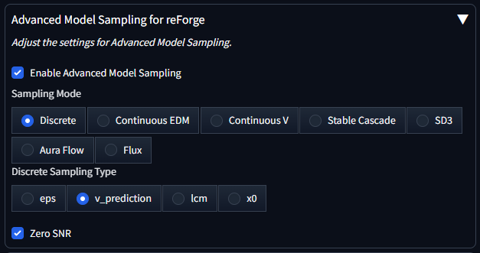
パネル内の[Enable Advanced Model Sampling]のチェックボックスをクリックしてチェックをつけます。
また、[Discreate Sampling Type]の項目の[v_prediction]のラジオボタンをクリックしてチェックをつけます。
設定変更後に画像を生成して動作を確認します。
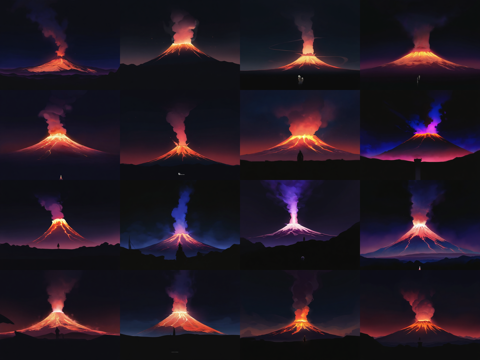
以下のプロンプトで、Enable Advanced Model Samplingのありなしで画像生成結果を比較します。
画像生成結果は下図です。今回のプロンプトでは違いが分かりにくいです。モデルとプロンプトの組み合わせによっては、Enable Advanced Model Samplingが無効の場合に
暗い部分が黒くつぶれてしまう場合があります。