Animaのver1.0が登場したので、LoRAの作成にトライしてみたいです。AnimaのLoRAはどのように学習すればよいでしょうか?

D:\data\model\に Animaのモデル(anima-base-v1.0.safetensors)、Qwen3(qwen_3_06b_base.safetensors)、VAE(qwen_image_vae.safetensors)
の各モデルを配置します。

AnimaのLoRA学習手順を紹介します。
LoRA学習をするためのプログラム、sd-scriptsをインストールします。
インストール手順はこちらの記事を参照してください。
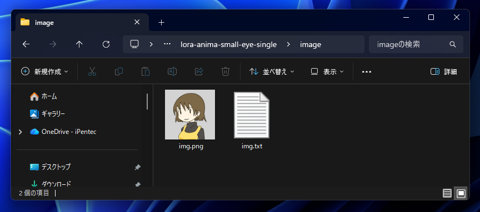
LoRAで学習させる画像データを準備します。今回は1枚だけの画像で学習してみます。
学習させたい画像データと画像を説明するテキストファイルを配置します。
girl, face, face close up
学習データを配置したディレクトリの一つ上のディレクトリに、dataset.tomlファイルを作成します。
ファイルの内容は以下となります。
[general]
enable_bucket = true

[[datasets]]
resolution = 1024
batch_size = 12

[[datasets.subsets]]
image_dir = '(学習データの配置パス)'
caption_extension = '.txt'
num_repeats = (学習回数)
[general]
enable_bucket = true

[[datasets]]
resolution = 1024
batch_size = 12

[[datasets.subsets]]
image_dir = 'D:\data\lora-anima-small-eye-single\image'
caption_extension = '.txt'
num_repeats = 192
学習データを配置したディレクトリの一つ上のディレクトリに、config.tomlファイルを作成します。
ファイルの内容は以下となります。
[model_arguments]
pretrained_model_name_or_path = "(事前学習済みモデルデータのパス)"
qwen3="(Qwen3のモデルデータのパス)"
vae="(VAEのモデルデータのパス)"

[dataset_arguments]
dataset_config = "(dataset.toml のパス)"

[cache_arguments]
cache_latents = false
cache_text_encoder_outputs = false

[network_arguments]
network_module="networks.lora_anima"
network_dim=8

[optimizer_arguments]
optimizer_type = "AdamW8bit"
learning_rate=1e-4
lr_scheduler="constant"

[flow_matching_arguments]
timestep_sampling="sigmoid"
discrete_flow_shift=1.0

[training_arguments]
max_train_epochs=10
mixed_precision= "bf16"
gradient_checkpointing = true

[saving_arguments]
output_dir = "(LoRAの保存先パス)"
output_name = "(LoRAの名前)"
save_model_as = "safetensors"
save_every_n_epochs = 1

[vae_arguments]
vae_chunk_size=64
vae_disable_cache=true

[sample_arguments]
sample_every_n_epochs = 2
sample_prompts = "(サンプル画像生成のプロンプトのテキストファイルのパス)"
[model_arguments]
pretrained_model_name_or_path = "D:\\data\\model\\anima-base-v1.0.safetensors"
qwen3="D:\\data\\model\\qwen_3_06b_base.safetensors"
vae="D:\\data\\model\\qwen_image_vae.safetensors"

[dataset_arguments]
dataset_config = "D:\\data\\lora-anima-small-eye-single\\dataset.toml"

[cache_arguments]
cache_latents = false
cache_text_encoder_outputs = false

[network_arguments]
network_module="networks.lora_anima"
network_dim=8

[optimizer_arguments]
optimizer_type = "AdamW8bit"
learning_rate=1e-4
lr_scheduler="constant"

[flow_matching_arguments]
timestep_sampling="sigmoid"
discrete_flow_shift=1.0

[training_arguments]
max_train_epochs=10
mixed_precision= "bf16"
gradient_checkpointing = true

[saving_arguments]
output_dir = "D:\\data\\lora-anima-small-eye-single\\output"
output_name = "eye-small"
save_model_as = "safetensors"
save_every_n_epochs = 1

[vae_arguments]
vae_chunk_size=64
vae_disable_cache=true

[sample_arguments]
sample_every_n_epochs = 2
sample_prompts = "D:\\data\\lora-anima-small-eye-single\\prompts.txt"
D:\data\model\に Animaのモデル(anima-base-v1.0.safetensors)、Qwen3(qwen_3_06b_base.safetensors)、VAE(qwen_image_vae.safetensors)
の各モデルを配置します。
サンプル画像を作成する際に利用するプロンプトを記述したテキストファイルを配置します。
girl, face, face close up --w 1024 --h 1024 --d 10000
girl, face, face close up --w 1024 --h 1024 --d 20000
sd-scriptsを実行するバッチファイルを作成します。
accelerate launch --num_cpu_threads_per_process 1 anima_train_network.py --config_file=(config.toml のパス)
accelerate launch --num_cpu_threads_per_process 1 anima_train_network.py --config_file=D:\data\lora-anima-small-eye-single\config.toml
ファイル配置は下図の状態となります。
コマンドプロンプトを表示して、または直接作成したexec.batを実行します。徐々に学習画像に近づいている様子が確認できます。
学習処理が始まり、完了しました。
出力ディレクトリのsampleディレクトリに出力された画像を確認します。
出力ディレクトリにLoRAのファイルが保存されています。
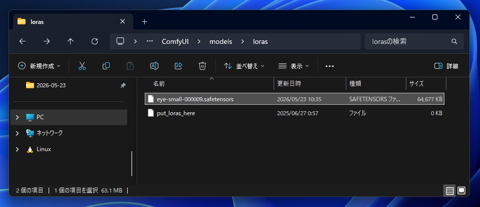
今回はComfyUIで利用します。
以下のディレクトリに作成したLoRAのsafetensorsファイルを配置します。
(ComfyUIの配置ディレクトリ)\ComfyUI\models\loras
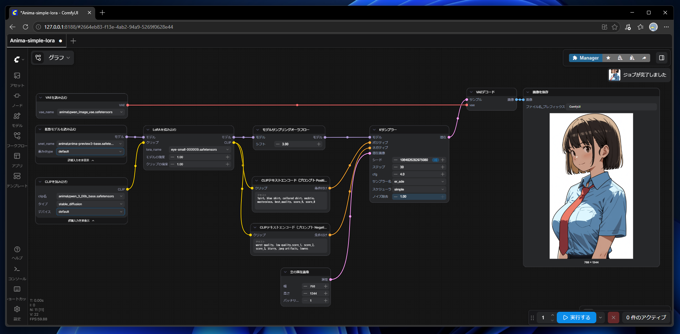
以下のワークフローを作成します。基本はこちらの記事で紹介しているAnimaのノードと同様です。
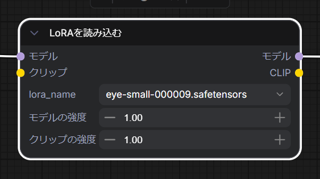
[LoRAを読み込む]ノードのlora_nameに作成したLoRAのファイルを指定します。
プロンプトは以下を利用します。
[実行する]ボタンをクリックして画像を生成します。[画像を保存]ノードに生成された画像のプレビューが表示できました。
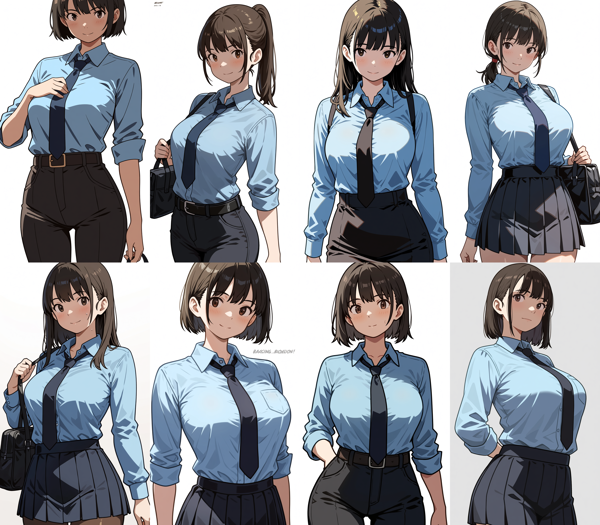
生成画像は下図です。LoRAが適用され、学習元画像と似た絵柄で画像が生成できています。
LoRAの影響が強すぎるためか、多様性がやや失われている印象があります。
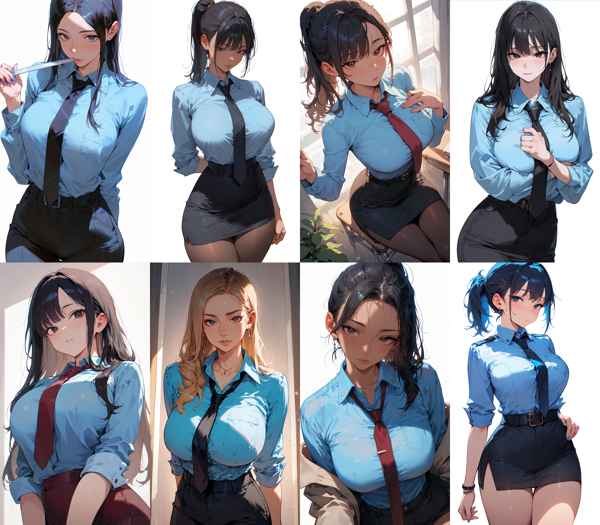
LoRAを適用しない場合との比較です。学習画像の影響があることが確認できます。